Thursday, September 30, 2010

Old Mirror Transformation

It's already Thursday and I feel like I've spent the last 3 days going in circles.  I had such high hopes for diving into my projects out in the garage and then maybe having some time left over for jewelry repurposing.  I had to let some of my goodies from Saturday's city wide garage sale take a number and get in line with all the other projects.  Don't we all want to give our new found treasures priority? 

I've also spent many hours buried in piles of paperwork and research this week.  Gulp....Mr. MST is retiring in 2 weeks, but that's another post blog.  So much to think about, especially medical insurance choices, taxes,  Medicare and Medicare supplements, etc, etc.  So, when I grow up and retire (yeah, right), I'll be an expert.

Time for a little garage therapy........

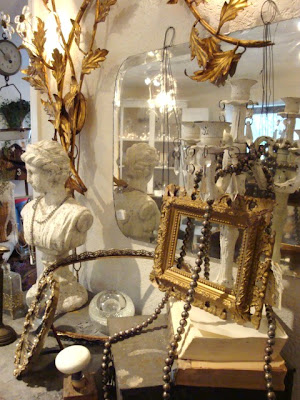
I've been hauling this mirror around forever.   I was ready to just give it away if someone had asked me my best price; you can't argue with free.  Enough is enough!  Time for a makeover!  I decided to take out the mirror, paint the frame black, and put in a burlap covered cork board. 
It just wasn't meant to be. 

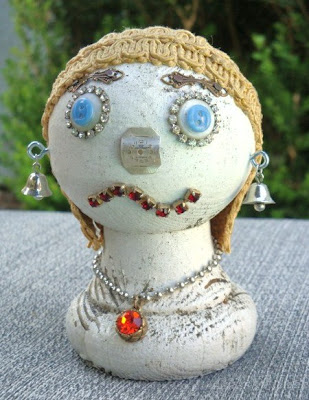
 When I removed the heavy back board, the whole frame fell apart.  Oops.  I just didn't want to spend the time gluing it all back together.

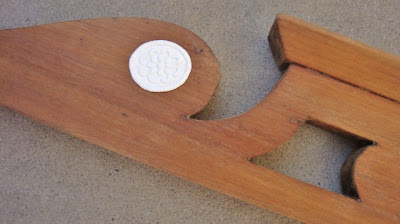
 I salvaged what I could.  I went to my handy dandy embossed wallpaper box and cut out two little circles.  I just licked them like a stamp and slapped them on.  This stuff is great to use in painted furniture refinishing projects.  It comes in all kinds of different patterns and is so easy to work with. 

This is what I ended up with.  I painted it white, roughed it up a bit, then rubbed it down with some brown acrylic paint mixed with a little water.  I attached a hook on the back because I thought it would look nice hanging over a door or window.

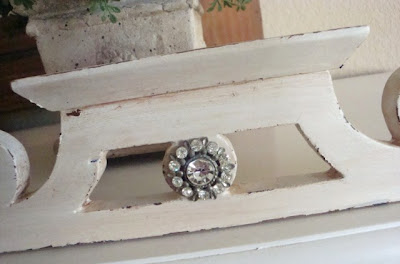
A vintage rhinestone button adds just a little sparkle.


One project out of the way is a start.  It's been really warm here the last few days, so maybe I'll just stay inside and work on some jewelry.  Sounds like a plan to me:)

I'm linking up with:


BRAMBLEBERRY COTTAGE


Photobucket

Sunday, September 26, 2010

Tracy's City Wide Garage Sale Haul

It was a good hunting day out there for Tracy's semi-annual city wide garage sale.  I was only out there on the prowl for a little over 2 hours, but I came home loaded.  Not me - my truck!  I think it was better this time, not so many homes officially participating - 37 down from the usual 100 plus.  Hmm, wonder why?  This time the official sale was on the east side of town.....prime pickin' spot full of older homes with years of accumulation.  The yard sale patrol won't shut you down if you have a sale on the west side, you just don't get your freebie ad in the newspaper.

The last time we had a garage sale was about 2 years ago during the city wide.  We vowed never to do it again during this time because there were just too many yard sales and it spread the bargain hunters real thin.  The local Goodwill and another thrift store really made out that day.  Cars and trucks were a dozen deep in both places waiting to unload the stuff that didn't sell.  Bright idea #1....I think I need to get myself over to both of those places today;-)

Here's my haul from Saturday:

I got this dresser for next to nothing because it's really in sad shape.  You can't tell from the picture, but the whole top is warped and coming off.  The mirror and frame are perfect, so I'm thinking about piecing this out.  I have an idea for the drawers and the piece holding up the mirror.  I love the frame on the long mirror that's sitting on the ground.  It needs some TLC, but the price was excellent.

Can you ever have too much silver?    I found six silver trays, pitcher, vase, flatware for stamping, glass doorknobs, and a lipstick holder.

I'm going to be turning that ugly duckling 70's style green globe into something fun.  I'll have to do a patch job on the old oval frame, then I think I'll put a cork board or black board in it.  The old card game came with a few hundred letters, the green thingy with the X and O is a glass ash tray, 4 vintage desert cups, and some jewels for repurposing.

3 oak Weis card holder boxes.

Little wood sewing box, kitchen stuff, and a tin full of sewing paraphernalia....haven't gone through it yet, but it looks interesting.

The white chippy mirror is good to go, but I might add something to the top just to make it pop.  I bought the little cabinet for parts: drawer, door, hardware.  It was only a few dollars because it has a big chunk out of the back and one side.  Repurpose, repurpose, repurpose:)

I already sanded down this table and it's going to be my first project.  The legs screw off, so it will be easy to transport to a show.  These lanterns are so heavy.  I think they'll get a coat of spray paint and then I'll put candles inside. 

3 Georgia B. Caldwell prints.

I was so excited when I spotted this old green metal cabinet.

I was even more excited when I opened it up and found all these buttons, thimbles, needles, and snaps.  5 drawers, 27 compartments full of goodies. 

Thank you Gertrude for your collection.


This week I'm linking up my garage sale finds with:
Southern Hospitality for Today's Thrifty Treasures and

 http://linda-coastalcharm.blogspot.com/


Tuesday, September 21, 2010

The Roseville Fall Antique Market

Once again, it was a wonderful day at The Roseville Antique Market.  The pesky intermittent morning showers didn't keep the dedicated shoppers and vendors away from this fabulous event.   My canopy and a few sheets of plastic kept us fairly dry until the sun popped out in the afternoon. 

Some of my jewelry creations.

I cut up some vintage sheet music and filled up this large glass jar. 
The top is missing, so I replaced it with a hand painted vintage bowl - a perfect fit.  The picture holder next to the jar was made from a tennis racket frame, sheet metal, jewelry scraps, and vintage buttons with
 magnets to hold the picture in place.

I glued bits and pieces of vintage jewelry along the top rim of the shells.

My table of silver, painted trays, and a bud vase made from
a stamp holder and laboratory tubes.


Booths were packed full of fabulous treasures.

 Miss Mannequin is so relieved that she's been adopted by a very happy shopper.

It was late in the day when I finally had a chance to make my way through The Tattered House. I love this place.....so much vintage goodness.  Sandy and Erika are the proprietors of this amazing little cottage/antique shop.  They are also the organizers of The Roseville Antique Market held in April and September.  Thank you both and your Tattered Team for all your hard work.  I took the following pictures of the beautiful treasures at The Tattered House.........
The back porch. I could sit and relax out here all day.

Ain't it the truth?

No, the picture isn't upside down....it's a shelf.

Beads, mirrors, doorknob, statue, books, oh my!

Love the skateboard, it looks like driftwood.

Thank you, we always feel welcome.


This week I'm linking up my vintage treasures with The Colorado Lady
for Vintage Thingie Thursday

Thursday, September 16, 2010

Mod Podge Mannequins

I'm always looking for new ways to display my jewelry and accessories.  I have two mannequins that I covered with vintage sewing patterns and another one that I covered with an old table runner.  I don't have any before pictures because I made them long before I started blogging.

I found this Plain Jane styrofoam head at a garage sale for 50 cents, holes in her head and all.  I thought she deserved a little makeover, so I got out my Mod Podge and vintage sewing patterns.

I used bits and pieces from both of these patterns to cover her face.

I started by filling the holes in her head with spackling paste and then sanded 'er down.  The Mod Podge (matte finish) was a little too thick for the tissue, so I mixed it with a little water.  I started with the larger pieces first and then filled in with smaller pieces.  I used a small foam brush to apply the Mod Podge to the tissue pieces and then carefully laid each piece down being careful not to pull or push too hard.  Most of you have probably worked with Mod Podge before, so you know how sticky it can get.  I think it's so much easier to smooth out the wrinkles if you keep your fingers wet.  Also, try not to touch any wet areas because your sticky fingers will pull the paper up.  When she was completely covered with tissue, I applied a coat of Mod Podge.  After that dried, I finished up with a final coat.

Right now she looks like she was just released from the emergency room.
I had to do a lot of cutting and folding in the neck area, but she still ended up with lots of wrinkles.  I guess that's something we'll all have to face sooner or later. 
Here's the quartet all ready to go.  I think I'll use the new head for displaying
hats instead of jewelry.  It's hard to see in the picture, but the front pattern piece says "front facing."
I used the thicker sewing pattern directions instead of the tissue for the larger plastic shell mannequin in back.  The other two are paper mache.  The one on the right was covered with an embossed linen table runner.  I can display more ornate pieces of jewelry on her because of her neutral background.

I'm linking up with these fabulous parties:


A Little Knick Knack


Sunday, September 12, 2010

Recycled Finial Folks

I spent a few hours out in the garage this weekend pricing and repacking for my next antique show.  I started looking around for a container to hold these chippy, mossy, crackling old finials that I posted about a few weeks ago in Yard Sale and Antique Show Finds.

I bought a bucket full (10) of these old post finials.

I thought about turning a couple of them into picture holders.  I was going to curl up some wire and insert the other end into the top of the finial.  I kept staring at them, and then decided they needed to stare at me....

She looks absolutely terrified because he's leaning in to make his move.

It's amazing how the shape of the mouth determines the whole attitude. 
For her makeover I used:  parts of two rhinestone necklaces, a watch face,
4 buttons, 2 eye screws, bells from a charm bracelet, ball chain, rhinestone charm,
2 brass connectors, and some gold trim removed from an old frame.

I love the receding hairline and scars.
For his makeover I used:  two screws/washers, upholstery tacks, picture hanger,
U-tacks, the eye part of a hook&eye, felt, button, two mystery thingies, and steel wool for hair.

I never did find a container or finish pricing and packing; this was just too much fun.

I'm linking my Finial Folks up with the talented and creative bloggers at:
Between Naps on the Porch for Metamorphosis Monday,
The T-Shirt Diaries for Upcycled Awesome, and
The Shabby Chic Cottage for Transformation Thursdays


Friday, September 10, 2010

New Life for Vintage Jewels

All the bits and pieces of old jewelry I've picked up over the last few weeks have been demanding some attention.  I managed to get several necklaces, earrings, and a couple of brooches together, but still have a huge stash waiting to be repurposed.....wouldn't it be nice to have 48 hours in every day?  I should probably stop bringing all these strays home until I can catch up with what I have.  Yeah, right. 
Here are a few of the pieces I made this week:

I liked the large spring ring, so I used it in the front as part of the design.  The green centerpiece is a vintage clip-on earring mounted on top of another salvaged part.

This brooch is made from an old black coat button, a flower pin, and a little glass and rhinestone ladybug.  I have two ladybugs and thought about making earrings, but they're just a little heavy for the ears.

I sewed 2 jump rings on the back of this bow tie and attached the adjustable chain. 
The center is a vintage rhinestone button.

This necklace was repurposed using parts of a vintage bracelet, necklace,
and earring.  I filled in the blanks with a new filigree and some silver beads.

The matching earrings are repurposed from vintage rosaries,
 necklace clasps, and soft pink beads.

This necklace is made from new and vintage beads.  I used two separate
vintage bracelet clasps for the bling on the pendant.

This week I'm linking up with all the talented and creative bloggers at:
Finding Fabulous for Frugalicious Friday,
A Little Lovely for Saturday Soiree, and
Under The Table & Dreaming for Sunday Showcase Party
Newer Posts Older Posts Home