Sunday, July 31, 2011

I Love a Good Yard Sale

Don't you love it when you hit a good yard sale?  I had so much to do this weekend and almost didn't go out treasure hunting.  Do you ever look at the yard sale ads on Craigslist or in the newspaper almost hoping you DON'T see something interesting?  If there's a buzz word that catches my eye, I have to go.

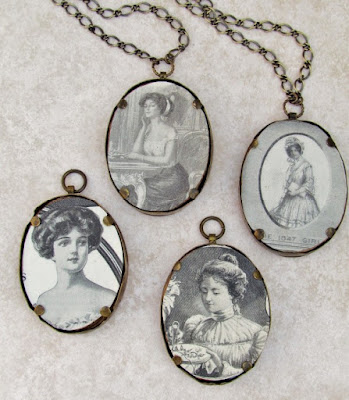
It was an "old and interesting" kind of day.  Those two framed prints caught my eye right away.  I still need to open up the backs to find all the money that's hiding inside.
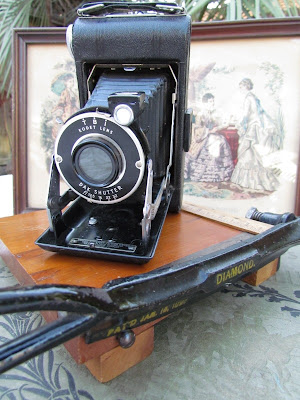
Unlike most of the old cameras I buy, this one won't be repurposed into jewelry.  It's still in great condition and will probably find a comfortable spot in my house.  The old 6" Diamond paper cutter still slices right through a piece of paper.
I thought this hydrometer with its original wooden case was so interesting.  I was told this one was used for measuring the density of milk.  Just what every household needs. 

Earthly Footsteps of the Man of Galilee.  I love old books and couldn't pass this one up.  It has some condition issues, but most of the 400 photographs are still in good shape.

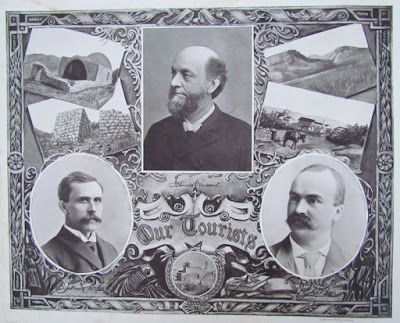
James Lee (left) is the author and Robert Bain (right) is the photographer.  The book was originally published in 1894 and has over 400 photographs of their journey through the Holy Land.
I had to have this little booklet. 
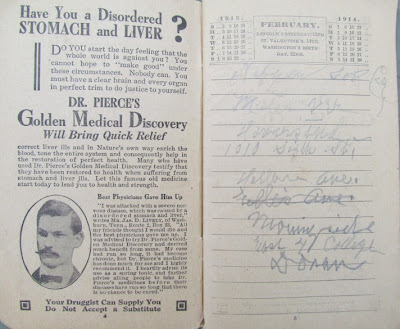
Dr. Pierce's magic potion will cure everything....

It will cure our backaches...
It will help us because we're so overworked.  Darn, no alcohol?
It will help with our nervous disorders...
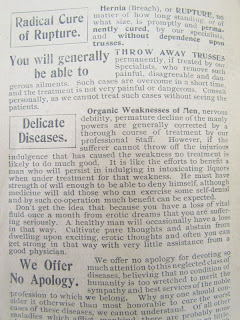
At least he acknowledged that men have their share of problems too.

I'm linking up my yard sale finds with:
Southern Hospitality for Today's Thrifty Treasures,
Charm Bracelet Diva for Club G.W.
Coastal Charm for Nifty Thrifty Tuesday,
Brambleberry Cottage for Time Travel Thursday,
From My Front Porch To Yours for Treasure Hunt Thursday,
The Thrifty Groove for Thrifty Things Friday.


Thursday, July 28, 2011

New Life for Tired Old Linens

I think most of us have a stash of vintage linens that have seen better days.  I have bunches of hand embroidered pillow cases, stained table cloths, ripped aprons, etc., that have been waiting in a repurposing pile for ages.  Most of them have some holes and stains, but with this project it's easy just to cut around the blemishes.   These are great for hanging lingerie or clothing with thin straps.  

The top hanger was made from a pillow case, the other two were made from table cloths.  The ready-made finished edges make them perfect candidates for these hanger covers.

These are real quick and easy to make.  I think it took me longer to dig out my sewing machine from the back of the closet, dust it off, set it up, and hunt for some white thread.  Oh well, off white would have to do.  Can you tell how often I sew? 

I like using white wire hangers for these.  Vintage wood hangers or plastic would work also, but I like using wire because they're thin and don't look bulky under the covers.  I can hear Faye Dunaway from Mommie Dearest screaming "No wire hangers!"  The last time I made up a batch of these, I couldn't find wire hangers anywhere.  I went to the cleaners prepared to pay for some, but they just gave them to me....25 of them. 

This pillow case has a few tiny holes, but not in the area I'll be using....

After lining up the scalloped edges, lay your hanger on top of both layers of the pillow case.  Center the hanger on the design and leave a few inches below the bottom of the hanger.  This way the pretty scalloped edge will be plenty long enough to cover the bottom of the hanger. 

I used a pencil to outline the shape of the hanger adding about 5/8" for the seam allowance.

You'll need to mark all the way down to the edge. I usually flair it out slightly at the bottom; it just seems to fit better after it's finished.  If you're making several of these at one time, be sure to outline each one with the actual hanger you'll be using.  The first time I made some of these, I used just one hanger as a pattern for all of them.  Even though the hangers looked to be about the same size, they varied as much as an inch in length....I had several covers that wouldn't fit over the hangers:(

After cutting out your pieces, pin them together with the right sides together. 

Sew together leaving a 1/2" opening in the top for the hanger to fit through. 

Turn right sides out and press.  I don't even bother with clipping the seams.

Slip the hanger inside....

Poke the hanger through the hole in the top....

Presto!!

The center hanger was also made from a pillow case, but I used a child's hanger.  The one on the bottom was made from a vintage apron.  It's hard to see, but there's a pink border on the edge.

You can finish them off by sewing on a few buttons.  Oops.  Don't like that hanger showing; I should have left more room at the bottom.

After sewing on the buttons, I used some self adhesive Velcro for the closure. 

For my latest batch of pillow case hanger covers from Sept. 2013 click here.

I'm linking up my vintage linen hanger covers with:
My Repurposed Life for Catch as Catch Can,
The Answer is Chocolate for BFF Open House Party,
Under the Table and Dreaming for Sunday Showcase Party,
Keeping it Simple for Motivate Me Monday,
Brambleberry Cottage for Time Travel Thursday.

Wednesday, July 27, 2011

A Package of Goodies

I love getting packages in the mail from my blogging friends.  This package arrived the other day from my friend Michelle from Mich L. in L.A.  I was the winner in one of her "Guess the Mystery Thing" contests.  

All kinds of mismatched jewelry findings, sequins, a piece of a plastic table runner, little fork thingies (I just might use for their intended purpose), chain, beads, and a couple of mystery items.  Could they be automotive parts? 

Michelle creates amazing jewelry from the most unconventional items.
Look at these fabulous earrings.  Do you know what those blue thingies are?
They looked familiar to me, so I guessed that they had something to do with doggie flea medication.  Turns out they're the applicator tips for her dog's flea control. 
You'll have to stop by her blog and play along for the next Guess the Mystery Thing contest. 

I couldn't resist creating a little something right away.  Everything is from the stash of goodies except for one headpin holding the beads together.  I think those automotive looking parts might be next.

Sunday, July 24, 2011

Miniature Picture Frame Necklaces

I had an ear-to-ear smile on my face when I spotted these miniature frames at an estate sale.  I loved the soft colors of the pretty prints and the perfect patina of the brass frames.  As soon as I noticed the convex glass, it was a done deal.

   Two sets of the same print was fine with me.  The one on the bottom
 right has faded, but the other three are still in good condition.  I kept trying to
 get a few stubborn spots off the glass, then realized they were tiny little bubbles.  Now that's old.

 Look at these dirty old time worn backs.  I thought these would be so pretty as necklaces, but had to do something about the condition of the backs first.  I sure wouldn't want something this dirty rubbing up against me. Two were repurposed into necklaces and the other two are still waiting.

 I cut out pictures from the antique fashion magazines I bought recently, then covered them with Mod Podge.  I wanted to save the original backs, so I tucked them back inside the frames.  The picture in the top right frame was making me crazy, so I ended up changing it.  The more I looked at it, the more it looked like a man's face in a woman's hat.

I'm really liking them as necklaces.  The prints are much clearer than they look here; I had a heck of a time photographing this convex glass.

I attached a 21" antiqued brass chain, added a tiny pearl on the end, and changed the ring to a decorative twisted rope style.  At first I thought they might be too bulky, but they're only 1 3/4" x 2 1/4" and only weigh 1 ounce. 

I'm linking up my repurposed picture frames with:
Between Naps on the Porch for Metamorphosis Monday,
Dittle Dattle for Amaze Me Monday, and
Boogie Board Cottage for Masterpiece Monday.

Wednesday, July 20, 2011

Buttons, Magnets, and a Painted Tray

In my last post I showed off this pretty hand painted tray that I bought at a yard sale.  It's huge, 19" x 27", so I thought it would make a nice picture and/or note holder.   This really is a quick and easy project.  I think it took me longer just to take the pictures.


I picked through my button stash for different sizes, textures, and colors to match the flowers in the tray.  I layered two or three buttons and glued them together with E6000.  I already had a roll of 1" wide magnetic tape, so I cut off pieces to fit each button and stuck 'em on. 

The tray is heavier than it looks, so I came up with this hanging idea because I didn't want to make any holes in it.  I already had some of these adhesive picture hangers and decided to use them because of the large gluing area.  I used some E6000 for added strength and glued one to each side.  These hangers can easily be peeled off if someone wanted to use it as a tray again.

I couldn't find a good place to hang this to take a picture, but you get the idea.  I thought about a brighter ribbon, but I already had a roll of gold (from a yard sale) and I like the way it matches the border. 

The ribbon can easily be changed or removed. 

I had buttons and magnets on my mind, so I thought I'd show how I display some of the magnets I sell in my booth at the antique shows.  I like to have some cheap inexpensive impulse items available, so I make up a few dozen of these at a time.  I made this display several years ago out of an old frame, and then cut a piece of sheet metal from Home Depot to fit.

A few milk bottle tops got thrown into the mix here.  So darn simple, and they look cute on the fridge.

This display has been good to me and it doesn't take up much room.  It's a vintage spiral clip-on earring rack. 

Please join me for these fabulous parties:
Pink Postcard for Transformations and Treasures,
The Answer is Chocolate for BFF Open House,
No Minimalist Here for Open House Party Thursdays,
Colorado Lady for Vintage Thingie Thursday,
Brambleberry Cottage for Time Travel Thursday,
Common Ground for Vintage Inspiration Friday


Sunday, July 17, 2011

Good Luck Girly Finds

The four leaf clover that was tucked inside the suitcase I bought last weekend brought me good luck all morning long.  We all know that some treasure hunting days are better than others, and this was definitely my lucky day.  Look what was greeting me as soon as I drove up to yard sale number three...

My new BFF.  I fell in love instantly despite her skin condition and the minor surgery I had to perform under one arm.  She came complete with this
 collapsible stand.

I think she was born sometime in the 60's.  These Adjust-O-Matic dress forms came unassembled through the mail.

Her brads have done a fine job holding her together over the years.
  No back problems.

Was that a yo-yo quilt sitting on the table next to my new friend?  I thought it was unfinished when I first picked it up, but then realized it was a skirt.

The lady told me that her mother made it for her in the early 60's and she would wear it with a slip/lining underneath.  I would hope so!

It's just a wee bit too small (23" waist) for my friend here, but I did manage to squeeze it over her head.
 
These were finds from another couple of sales that same day. 

This is such a sweet little purse with its built in coin holder.  I already removed the crushed flowers on top and replaced them with a couple of buttons.

I had to have this rose covered shelf edging....all 18' of it.

Several pieces of lace and trim.

Some more bling and watches for repurposing.  Those shoe clips are my favorites.

I've been looking for one of these fabric covered hat molds, but they're usually so expensive.  When I saw this one, I wasn't going to let a few water stains keep me from bringing it home.

I think it will make a good jewelry display for now.

This pretty hand painted tray measures 19" x 27".  It has a couple of scratches and a few little dings, but the painting is in really good condition.

I'm linking up my girly finds with these parties:
Her Library Adventures for Flea Market Finds,
Southern Hospitality for Today's Thrifty Treasures,
Type A for Anything Goes Party, and
Charm Bracelet Diva for Club G.W.
Newer Posts Older Posts Home